Halloween Desserts: Face Pie, The Necronomipie

While I’ve pretty much locked in meatloaf head as my go-to savory bring-it, I’ve tried quite a few Halloween desserts and just haven’t found one that was worthy of repeating yet—until now. Looking for Halloween baking ideas, I ran across these really creepy pie faces and was bummed to discover they were made of latex and foam. Not to be discouraged though, I proclaimed, “I could totally do that with real pie,” and I did. The result was not exactly like the not-food versions, but definitely sufficiently creepy and relatively easy to boot.

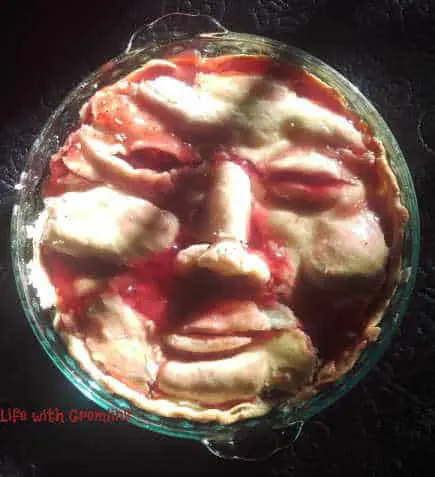
I give you, face pie, the necronomipie.
 face pie halloween desserts necronomipie

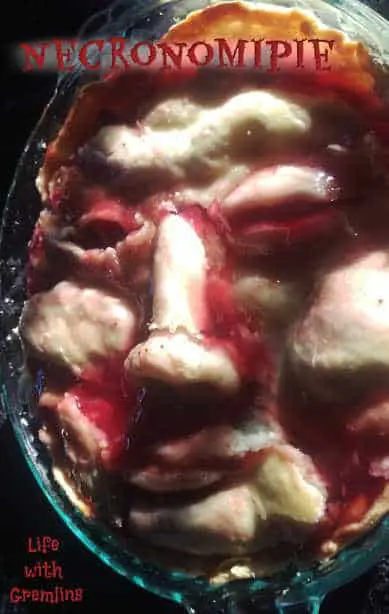
Pictured is cherry, but you could easily do this with strawberry or triple berry to keep that red filling look. I might try a chocolate cream pie or even cheesecake with a top cherry layer in the future as well. You could do chicken pot face pie even, but I’m not sure if gravy would look as neat on the pie face and, well, Halloween desserts are more fun anyway.

Assuming you do cherry, you don’t need much. I used two pre-made pie crusts, canned cherry pie filling, and an egg. You could, of course, also make your own pie crust and filling. The bottom of this pie is sort of irrelevant to the face-pie effect, so you can use whatever recipe for that you like.

To make the face pie top crust, you’ll need a butter or pastry brush, a sheet pan with a flat edge (I used a pizza pan, but something like a spring-form pans base would work too), and tin foil.

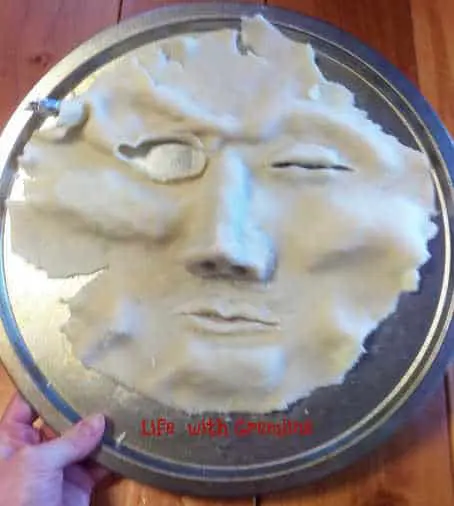
Start by building a tin-foil support structure. Pictured you can see my rough nose, chin, and cheekbones. I also added a little brow and lift in the closed eye after I took the photo (added in the artist process). These are also just balled up tin foil.

halloween desserts face pie

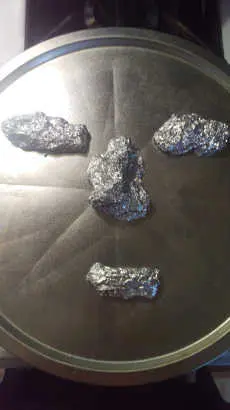
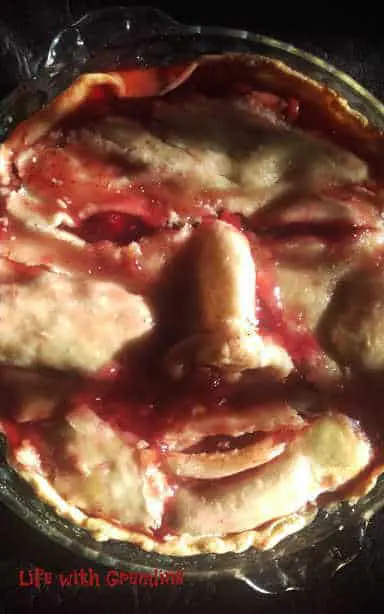
I’ll note here that I didn’t grease my surfaces, and everything came loose just fine except the nose. You can see in the pie face where the nose even cracked a bit as I removed it from the frame. This is probably because building the nose requires some pushing and smoothing of the dough (have it at room temp btw to ease that process). Next time I make this I plan to try greasing it to see if that works out better.

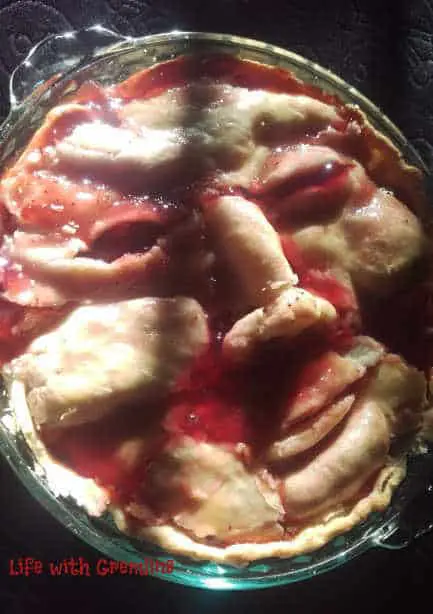
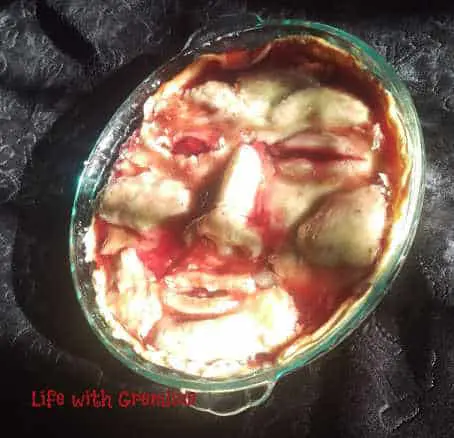
After you’ve got a frame worked out, drape a single pie crust over it and begin building your face. I used a kitchen knife to cut out one eye socket, a slit in for the other, and cut out the mouth shape. I made the edges a bit ragged and used the cuttings from that to build up a bit around the eyes and lips as well as build the nose. It helps during this part to look at a picture. It’s OK if it’s not perfect, the end product is supposed to resemble a skinned face on a pie—most people aren’t going to look their best in that scenario.
Halloween desserts pie face

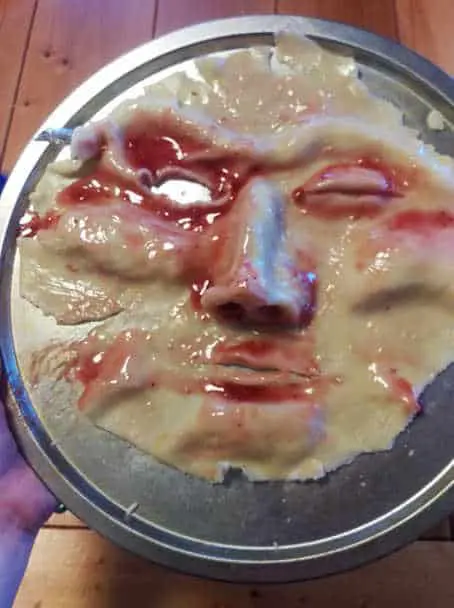
Once you’re happy with your face, paint the entire surface in an egg wash (just a beaten egg). Then go back over the cheekbones, highlight of the nose, and brow with a bit of cherry filling on your brush. Think of it sort of like applying makeup.

Apply heavier around the eyes and in crevasses. I actually used a spoon for the heavier parts. You could make this darker by trying red food coloring, I alas somehow have more than 50 food dye colors in my cabinet but not a single one of them was red.
pie face top crust

Then you just bake your pie face following the instructions on your package or in your recipe. Once it’s done use a spatula to carefully lift each edge and remove the tinfoil frame. This is a somewhat delicate process, go slow. It will still be a bit soft and flexible in spots.

The final step is to slide your pie face onto your finished base. I do mean slide, literally. I hovered the pan I cooked it on over the pie and carefully slid it on to the surface. Once on your pie, you can do some adjusting. For instance, I pushed some spots into the filling to give my face pie some ooze and spooned more in other spots. It’s sort of up to your own artistic touch as no two tries at Halloween desserts such as this are going to be the same.

We’d love to see any tweaks you make in comment or hear about what worked and didn’t work for you if you try this. While this is something I will be making again, like all Halloween desserts, it’s not something I have or probably will make a lot. Trial-and-error by comment is always welcome.

pie face Halloween desserts Halloween desserts pie face Halloween desserts pie face Halloween desserts pie face Halloween desserts pie face

New Year’s Baby Superstitions and Trivia

While you’d think the tax cuts alone would encourage parents to wish for their new baby to come before the new year, many aim for New Year’s Day itself. This may be because in most communities being the first baby of the new year comes with fame — and gifts. That one lucky newborn is usually in the paper or on the news, and often the family receives some sort of gift package. Packages vary by area, but it’s often donations such as merchandise, baby goods, or gift certificates from local businesses who hope to make it in on that free advertising when their name appears in the news release on the baby. However, having a New Year’s baby comes with other suggested perks, even if your baby isn’t the very first to cross the cervix.new year's baby

So, what’s up with the whole New Year’s baby stigma, anyway?

Outside of our competitive drive to be first, the concept of the New Year’s baby being an actual symbol of New Year’s is pretty old school. An infant has been a sign of rebirth since Ancient Egypt. Ancient Egypt was also the first civilization to associate this symbol with the new year, and in the lap of a bearded man at that. In later times, that bearded man became “Father Time,” and the mythos that the child would age into an old man by December to hold a new baby in his lap arose. It’s easy to connect a new human life to the start of a new year, which is perhaps why the tradition has passed through the ages to be depicted in silly cartoons in the modern world and warrant extra gifts and celebrations for that first baby of the year — who luckily will not actually age faster than usual.

What other perks come with having a New Year’s baby?

On top of the gift basket and the publicity, there are a few superstitions surrounding those born on New Year’s Day.

— Babies born on the New Year Day are said to be lucky for life.

— The family of a New Year’s baby will have good luck that year.

— New Year’s babies won’t be visited by evil and can’t be drowned or hung.

— A baby born on New Year’s Day is said to have great fertility and a green thumb.

Of course, none of the above outweighs the joy of a healthy baby. If you’re thinking about inducing simply to have a New Year’s baby, you may want to think twice. Inductions should never be performed without medical necessity.  Besides, many superstitions come with a clause that when the “lucky” task is forced, the luck is reversed. For instance, looking for a four-leaf clover will make the clover unlucky if you find it.

Halloween Treats: Dark Chocolate Spider Cake

hallowen spider cakeAfter opting to use my cool new 3D skull cake pan to make meatloaf head, I still had to make cake for our Halloween party—because what’s a party without cake? I’m not gonna lie here, I may make a tasty cake, but they are often less than beautiful. I am not the artistic type, so I wanted to do something that looked cool, but required exceptionally little effort. I settled on a spider web design using dark chocolate ganache and white chocolate drizzle. The result was not only delicious, but looked deceivingly professional.

How can you fake your friends into thinking you got cake deco skills too?

First, bake a cake. This would look just as nice in rounds, I just used a 13 X 9 because it was a party with lots of cake lovers. My cake was my own brand of cheater. I used boxed Ghirardelli dark chocolate brownie mix and red velvet mix.

If you opt for this as well, first make the brownie mix as directed, but add 3 eggs rather than 2 and milk rather than water. In a separate bowl, mix the red velvet also with milk rather than water. Swirl the two mixes together in your pan and bake at 350 degrees until a toothpick comes out clean.

I used cheesecake pudding between my layers, but you could also do a cream cheese filing or homemade cheesecake if you have more time than this mom of 4.

While your cake cools heat 1 cup heavy cream over medium heat. Once bubbles begin to form (not quite boiling) pour over dark chocolate chips and stir until creamy before beating on high to fluff. Frost cake with this.

Repeat these steps with ½ cup heavy cream and white chocolate. Place into drizzle bottle and just sort of draw lines all over the place on the cake. Bam, webbing. Now just top with some plastic spiders.

halloween spider cake