Halloween Meatloaf Skull Recipe: The Perfect Party Meat Dish

Being that I love cake and Halloween enough to get a skull-shaped cake pan as a birthday gift, it’s a bit odd my first thought on seeing said pan was not, “That is going to make an awesome cake.” It was actually “OMG, I have to make a meatloaf skull!” A few years back I saw this quite cool recipe from Not Martha on making a realistic meatloaf hand, and that recipe really stuck with me I guess, because it overrode cake. Anyway, chances are you don’t give two sprinkles why I decided to make a Halloween meatloaf skull, you just want to know how to make one, so let’s get to that.Halloween Meatloaf HeadCake skull pan

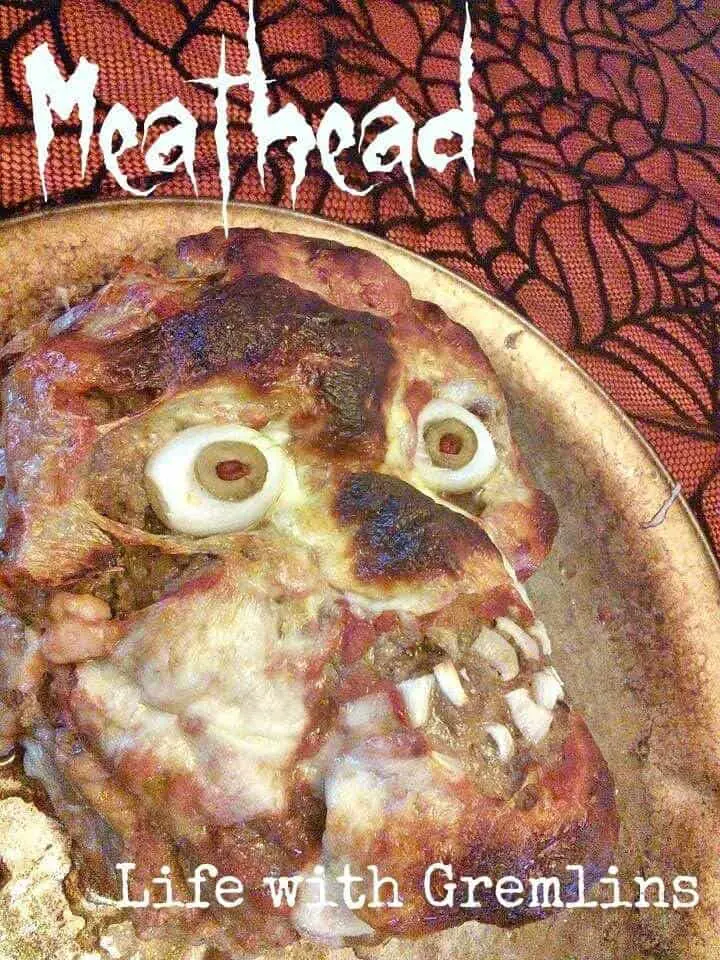
First, you kind of need the 3D skull pan, though if you are more artistic than I, you may be able to sculpt yourself a head and deprive Amazon of about $30. Assuming you have or buy a pan, you’ll need to grease it well. The rest of this meatloaf skull recipe also assumes you use the pan because I did.

Next, prepare about 4 lbs of meatloaf. I will share my recipe at the end of this post, which includes a handful of chopped mushrooms, 2 small onions, bread heels soaked in milk, spices to delicious, and some egg, but the recipe you use is irrelevant. Everybody has a favorite meatloaf recipe—feel free to use yours.

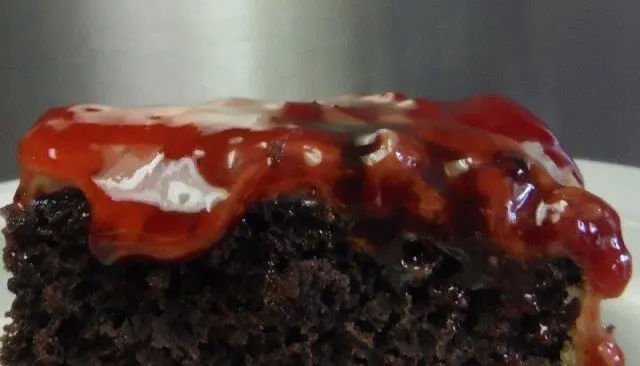
Once your meatloaf is ready, set it aside and prepare a small pan of chunk-free marinara sauce. “What?” You may be thinking, “Why do I need pasta sauce for meatloaf?” Well, Not Martha used ketchup, and what is marinara if not better-tasting ketchup? I also decided to stuff my Halloween meatloaf skull with mozzarella and sauce so that when it was cut brain-like material would leak out.

This coincidentally made it taste sort of like noodle-free lasagna—spooky and tasty. The sauce I made was very simple. It’s just one can of tomato sauce spiced to taste (garlic powder, pepper, salt, parsley, oregano, and a bay leaf is a good start). On that note, you can display your meatloaf skull on a bed of pasta with sauce and let guests detach head bits to make it a main course. I’ve made this for quite a few parties now, and both options are always a hit. It’s become one of my favorite Halloween meat dishes. My kids even sometimes request it just as a Halloween dinner.

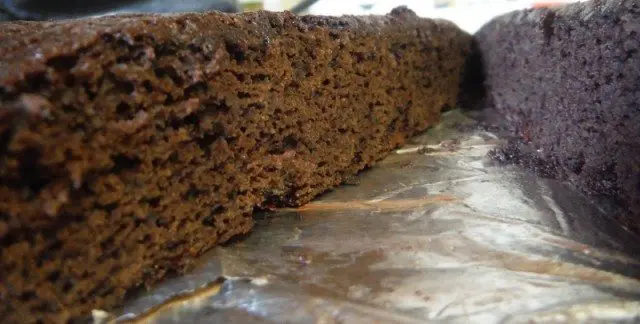
Back to the recipe, let your sauce simmer while you cut some mozzarella cubes and thin slices. When finished, pack the vast majority of your meatloaf into the pan leaving a hallow compartment in each side for the mozzarella cubes and some sauce. Here’s a photo example of how to do that, if you’re a visual learner.

halloween recipes meatloaf

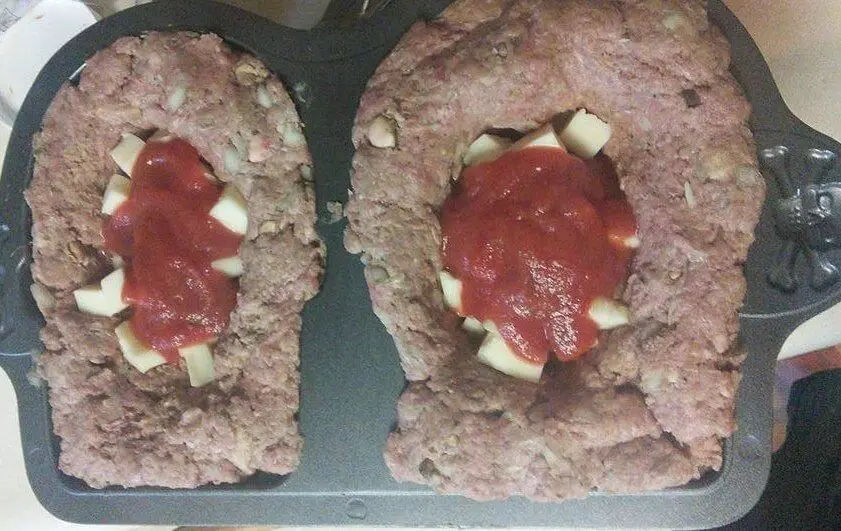
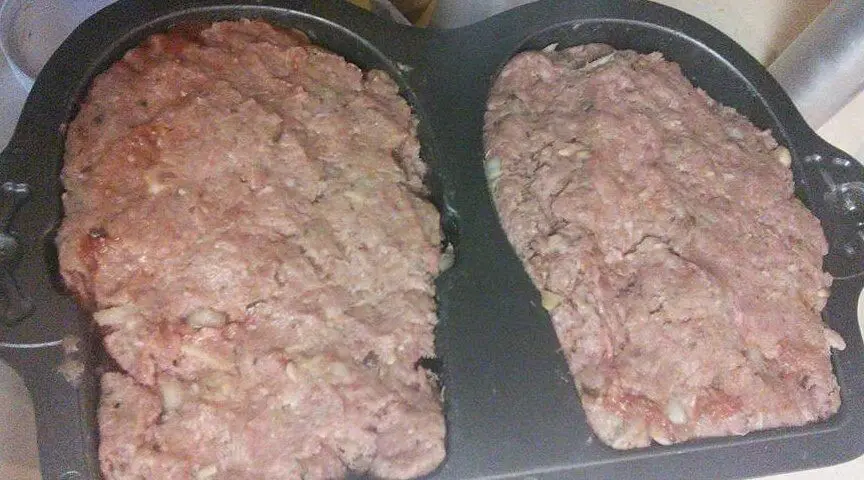
Close these compartments with the not-vast-majority of your meatloaf you should still have on hand. Now, you should have two stuffed meatloaf loaves that look like this:

meatloaf head

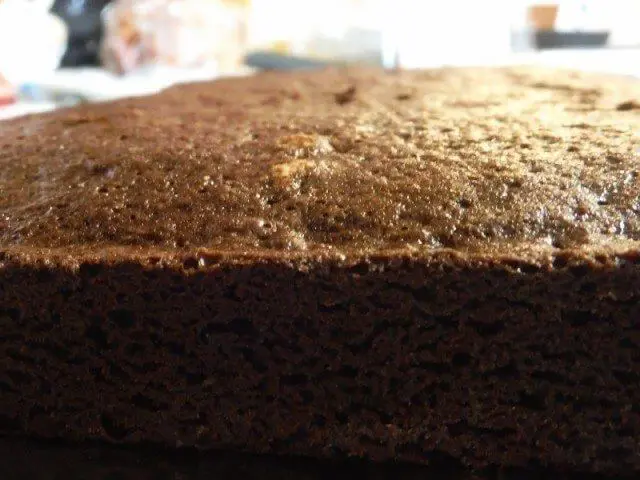
This was the point in my recipe that I had to make a call. My friend suggested cooking it for a bit, and then removing it from the pan to add the face details. I worried that wouldn’t work well with things like eyes. So, I lined a baking sheet with tinfoil and plopped my cake pan upside down. That’s why a well-greased pan is key—out popped a perfectly-sculpted stuffed meatloaf skull.

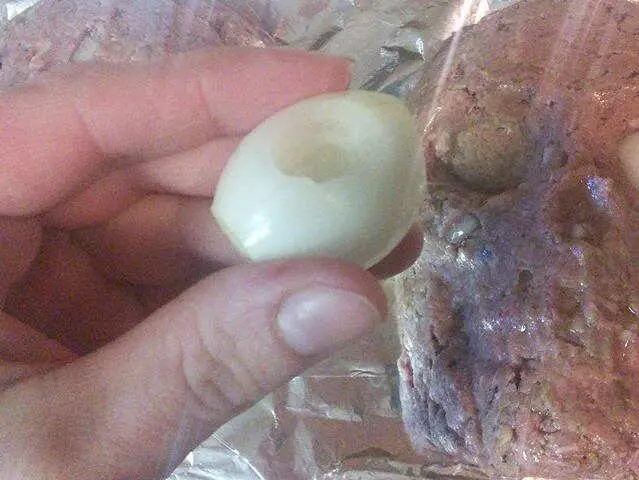
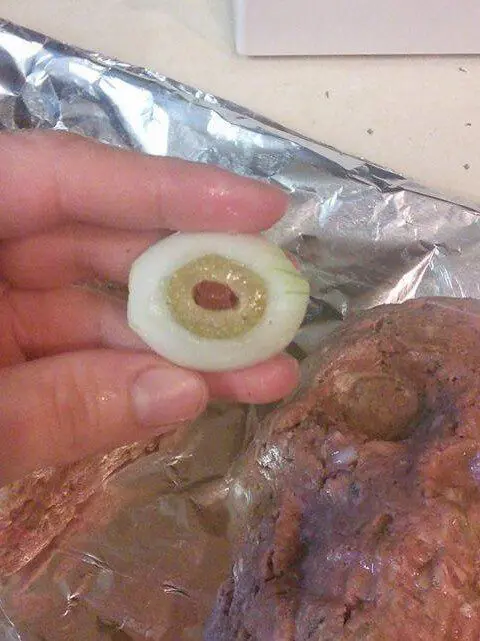
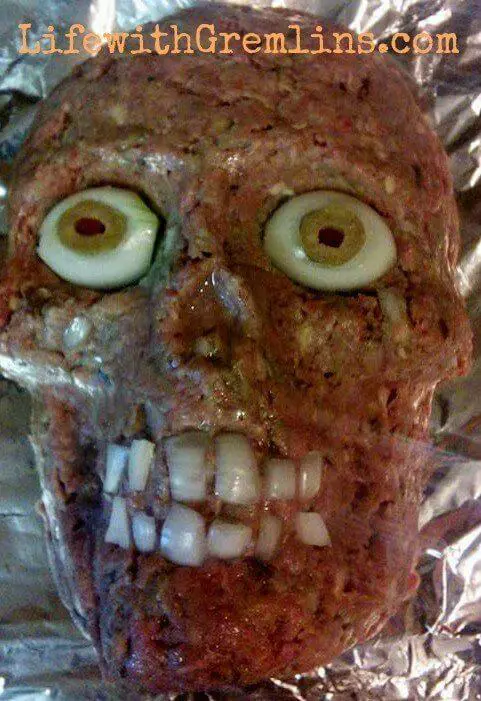
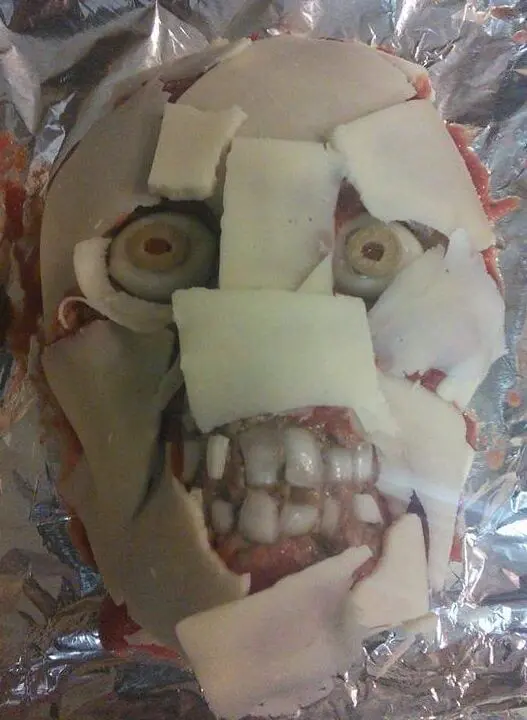
First, Frank needed eyes (I decided to name him Frank). Initially, I was just going to place half of a white onion in each of the skull mold indentations, but that seemed insufficiently creepy. How is a meatloaf skull supposed to stare into your soul without pupils? To add those, I cut a small indention in each onion half and hollowed it out to insert the end of a cocktail olive. The effect was super cool. They looked like real eyes. I will say my white onion came from our garden, so if you have trouble finding this small size, you might opt for a shallot. Then, I just added onion chip teeth.

meatloaf eyes meatloaf eyes

halloween meatloaf skull

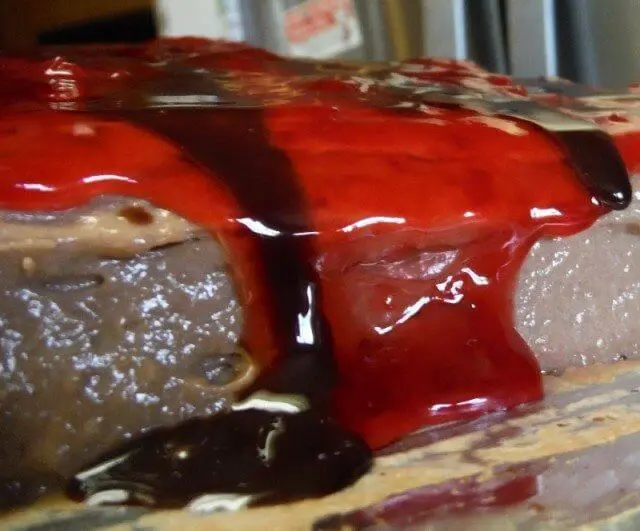
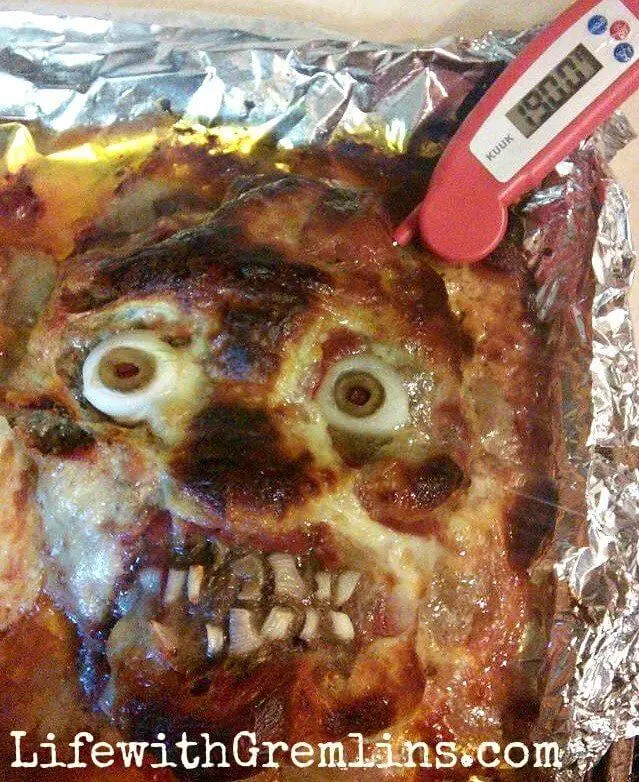
Next, take the remainder of your marinara and paint it on the skull. Then, layer the thin cheese strips over the top. Pop it in the oven at 375 degrees for about 90 minutes. Cook time may vary, so keep an eye on it. This is also ground meat, so be sure to temp your monster creation for food safety reasons. You’ll notice from my meat thermometer in the photo I accidentally overcooked mine a bit. It doesn’t need to be 190 degrees.

Halloween meat disheshalloween meatloaf headhalloween meatloaf head

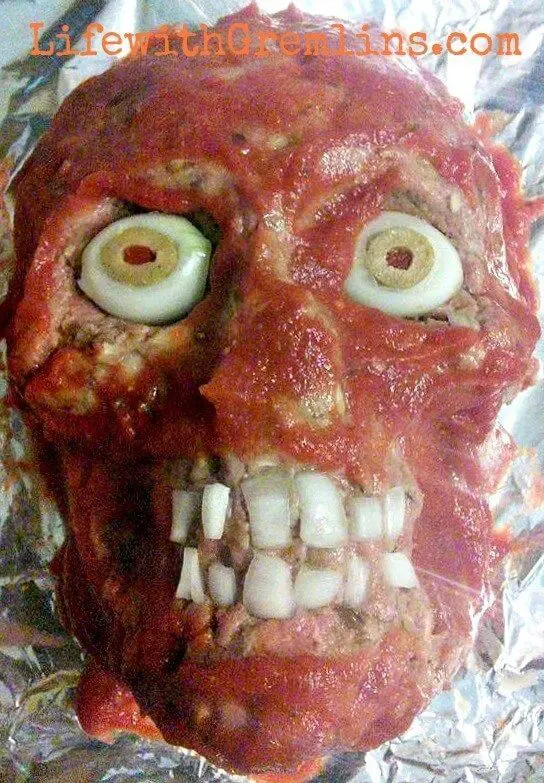
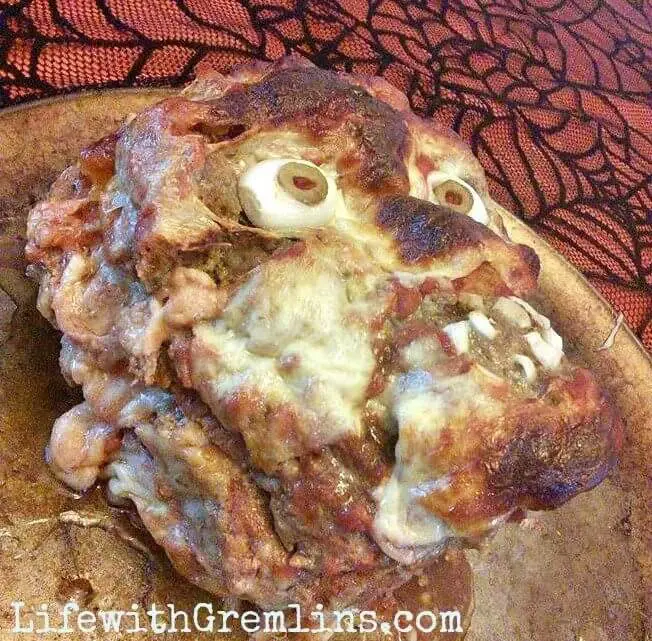
Once done, as you can see, there was a bit of brain drippage. I used a spatula to move the meatloaf skull to a clean pan for presentation reasons. I will admit stacking the two sides was a bit tricky, but the end result was the perfect head for our family’s annual Halloween party meat skeleton.

The one issue I found with this recipe, or technique more accurately, is that the skull spread a bit on one side while baking distorting the shape. I am not sure how this could be remedied, but am open to suggestions in the comment section.

Don’t want to read all that? Here’s the quick version—how to make a Halloween meatloaf skull:

Ingredients:

Meatloaf:

4 lbs ground beef
2 onions
1 cup chopped mushroom
6 bread heels soaked in milk
spices to taste

Sauce:
1 can tomato sauce
spices to taste

Stuffing and decorations:
1 lb mozzarella cheese
1 small white onion or shallot
2 green cocktail olives

Instructions:

Grease 3D skull pan.

Make meatloaf by combining the first 5 ingredients in a large bowl by hand. Set aside, and simmer tomato sauce and spices on stovetop.
Cut 1 ½ cups cheese cubes and about 15 thin slices.
Stuff the 3D skull pan with meatloaf leaving a hollow cavity.
Fill cavity each with cheese cubes and a total of ¾ of the sauce, and then close off with more meat mixture.

Flip pan onto cookie sheet

Cut each small onion in half, then hollow out a penny-sized cavity. Cut the end from two cocktail olives, and insert them into the onion holes. Place onions in eye sockets on meatloaf skull. Cut onion chips. Arrange as teeth.

Brush the skull with the remaining sauce and layer with cheese slices.

Bake at 375 degrees for approximately 90 minutes or until internal temperature reads a minimum of 160 degrees. Allow to cool and transfer to a platter or serve over pasta.

Halloween Meatloaf Headhalloween meatloaf skull Want more scary Halloween recipes? You’re in for a treat—serve your meatloaf skull with a side of severed face!

Brownie Mix Cake Recipe: Making Cake from Brownie Mix

Dessert—it’s what I do. Well, it’s what I always volunteer to bring to family gatherings, because I love sweets, and as a result, I’m pretty good at making sweets. This year at our Mother’s day bbq I had planned some delicious dark chocolate cake with ganache, cheesecake, and strawberries in layers, but alas, I forgot to get all the ingredients. I live kind of in the backwoods, so a drive to the store is not a 5-minute ordeal for me. It takes 30 mins in drive time alone. I did have brownie mix and no-bake cheese cake mix though, so I decided to see if I could make a cake from brownie mix and something like frosting from cheesecake mix. The first thing I did was check the Google Gods and Reddit for recipes.cake from brownie mix

Notta. Really? No one has tried to make cake using brownie mix before? I saw lots of recipes for the opposite, cake mix to brownies, but none brownie mix to cake. I figured that could either mean it couldn’t be done or people just like brownies more than cake. Either way, challenge accepted.

So, logically, the first thing I needed to know as a novice baker was the difference between brownie recipes and cake recipes, or cake mixes and brownie mix.

The consensus seemed to be that brownie mix contained more fat and less leavening. I decided on switching the oil for no-sugar-added apple sauce to reduce fat, the water for milk (as I had done this before and gotten more cake-like brownies), used two eggs rather than 1 (as the box suggests for cake-like brownies) and added 1 tsp baking powder for additional leavening. I was a wee bit worried as I would not have time for a do-over.

After setting that to bake I set my noodle to the frosting, and you know, why can’t no-bake cheesecake be frosting? It’s already not cheesecake really. So, I just added about ¾ cup of Ghirardelli chocolate cocoa to it before blending to make it chocolate. (We buy Ghirardelli in bulk for mochas).

I was happy to see my brownie mix did indeed rise like a cake, albeit quite dense, and turned out a very chocolatey and moist. Challenge, complete.
cake using brownie mix
Seeing how this turned out it would be an amazing layer cake or for use in shaped-cakes and 3D pans where a firmer cake is preferred but you still want a good moist flavor. I didn’t have any chocolate to make a drizzle or glaze to cover that semi-unattractive looking strawberry layer (it was a pack included with the cheesecake) so I used just Hershey’s syrup. It made an odd effect on top. If I made this again, I’d do two rounds, place that strawberry in a middle layer with some of the cheesecake, and cover the top in a dark chocolate ganache glaze after frosting.

Here’s some more pics of the texture

brownie mix cakebrownie mix cake

Anyway, wanna try it?

Ingredients:

-One box Ghirardelli Dark chocolate brownies

-1/2 cup non-sugar-added apple sauce (the lunch cups are perfect sized)

-1/4 cup milk

-2 large eggs

-1 tsp baking powder

-One strawberry no-bake cheese cake mix
-3/4 cup Ghirardelli cocoa

Instructions:

Preheat oven as directed on brownie mix. Make brownie mix using apple sauce in place of oil, milk in place of water, and add both eggs and baking powder. Mix well and bake as directed for your pan size.

Make cheesecake filling as instructed on box, but add ¾ cup cocoa before mixing.

Frost cooled cake, add strawberry topping, and chocolate drizzle if desired.

Super. Freakin. Simple. Just how I like it.

cake using brownie mix cake using brownie mix brownie mix cake

Robot Cake Guide

robot cake

My about-to-be 3-year old wanted a robot birthday party. Being a fairly frugal mom, I always make my kids’ birthday cakes. My first thought for a simple robot cake was to make a sheet cake, put some Transformer action figures from the toy aisle on it, write happy birthday, and be done with it, but you know, he didn’t say he wanted a Transformers birthday, he said robot. I decided to make an actual robot-shaped cake rather than a cake with robots on it. The result was not only simple to make, but very “cool” according to my little man. The cake turned out good enough, I thought I’d share a how-to guide.

How to make a robot cake:

Ingredients you’ll need:

Two boxes of cake mix: I used chocolate with a box of pudding added and milk instead of water, but I let my kids choose the flavor of their cakes. You can also make yours from scratch if you prefer.

Two containers worth of white frosting: I made cream cheese frosting equivalent to about 2 store-bought tubs. As long as its white, you can use any frosting you like.

Black food coloring: Note, that in some areas this can be hard to find when it isn’t Halloween. Plan ahead, you may have to order some.

A frosting writer pen: I used black

Assorted button-shaped candy: I used Rolos wrapper on, mini Rolos, Riesens wrapper off, and part of a Hershey bar

Donuts: I used two round cinnamon rolls, one round twist, and two glazed twists. Frugal tip: Many bakeries offer an after 6 pm special where donuts cost less.

A 13 x 9 pan, a large muffin pan ,and one 4 X 9 bread loaf pan

Instructions:

First, bake one sheet cake in the 13 X 9 pan, one loaf cake in the 4 X 9 pan and two large cupcakes in the muffin pan (papers aren’t necessary). You may opt to do a two- layer cake on the 13 X 9 if you wish, but you’ll require more cake mix and frosting than I did. Allow to cool before frosting.

Empty the frosting into a large bowl, add drops of black food coloring, and mix until your desired soft-grey to silver robot shade is obtained. Frost the sheet and loaf cake and arrange. You may find rinsing your frosting wand between applications helps it smooth on easier. I used a Commercial cookie sheet for my robot cake and it fit perfectly. You may have to construct a serving tray if you don’t have one. See the photo attached to this article for arrangement. The loaf cake is the robot’s head, and the sheet pan is the robot’s body.

Add more food coloring to the left over frosting to achieve a slightly darker grey and frost the tops of the cupcakes, then cut the muffin tops off, and attach them as eyes.

Next, cut two round donuts in half (this is where I used my cinnamon roll donuts), frost both halves, and attach as the robot’s legs. Frost two donuts (this is where I used the twist donuts), and situate them as the robot’s arms. Finally, cut another round donut in half (my round twist) and place it between the loaf and sheet cake for a neck joint. Again, you can look at the photo of this article for a visual guide.

To finish up, write “Happy birthday” or your desired message in a robot-like square font. Attach candy as buttons as desired. Break off two squares of Hershey bar and score with a knife to appear as a mouth. Since my son was turning three, I attached candles as antenna on the robot’s head. This would work well for robot cakes for children turning one to three.

Overall, I would rank this robot cake firmly in the beginner’s category on difficulty level, it really is as easy to make as baking a cake, but looks pretty neat.