After three boys, I thought I’d seen all a baby butt could turn out—from poop paintings to corn kernels—but when my fourth child started getting weird acidic poop that literally seemed to eat her skin away, I was sort of baffled. Acidic diaper rash was not something I had heard a lot about, but it happens, and it is horrible.
What is acidic diaper rash?
Acidic diaper rash occurs when for one reason or another your baby’s poop becomes acidic in pH and burns the skin. For my baby, this was obvious by immediate bleeding rashes (when I knew she had just pooped). These bloody spots almost looked like she’d been poked repeatedly with a small pin and were only where the poop had touched.
Other types of diaper rash occur more frequently where the diaper touches the skin or in skin creases, but this rash will be very red, possibly bleeding, inflamed skin only where the poop is touching, and it will be there no matter how quickly you change the diaper. I think that’s the biggest tell that a rash is acid-poop based, it happens almost instantly.
Next, the poop that accompanies acidic diaper rash is often runny (diarrhea) and looks poorly digested, like there are often still recognizable chunks of lunch. In formula or breastfed babies that haven’t started solid foods, the poop just looks very runny and lacks the common seedy yellow appearance. It may also have an off odor that just doesn’t smell like normal poop, almost rancid or sour.
What causes acid diaper rash or acidic poop in babies?
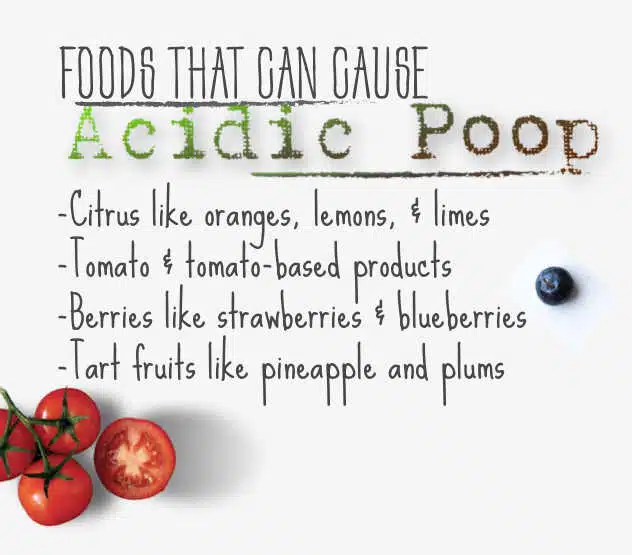
Some babies can get acidic poop from high fruit intake, too much juice, or eating foods that are acidic, such as tomato sauce or citrus fruits, but in my baby girl’s case, it was fructose sensitivity (malabsorption). It can take some diet exploration to pinpoint the cause of acidic poop, but the cause is almost always dietary.
One of the easiest ways to identify a food allergy, intolerance, or sensitivity is to keep a diet log. Note days that the diaper rash, acid poop, or other symptoms of indigestion occur and find common factors, then cut one factor at a time from your baby’s diet to see what works. Breastfeeding moms will also need to track their own diet and avoid problem foods.
As fructose sensitivity is a common culprit of acid diaper rash, I caution that not all fruit will get a reaction. Bananas, for instance, are often fine and remember that high-fructose corn syrup can also create an issue ( “high fructose”).
Finally, while most dairy is alkaline, lactose intolerance can lead to acidic diaper rash as well. Unabsorbed lactose is fermented into lactic acid by bacteria in the colon, which will lower the stool (poop) pH.
How do you treat acid poop burns?
The most important step when it comes to rash treatment is to identify the dietary issue causing the rash and eliminate it. The butt burns actually heal quite quickly as long as the acid poops stop. In the meantime, it can help to avoid baby wipes by using either a small squirt bottle or just a quick butt rinse in the tub. As it’s the wiping motion that tends to hurt, just dab the skin dry afterward with a soft cloth, or if you’re brave, let that little bum air dry.
The best diaper rash cream I found for acidic diaper rash is the Triple Paste, though it’s best to avoid applying anything but fresh air until the burns are no longer actively weeping. Thankfully, so long as your baby’s diaper is changed quickly, the burns usually aren’t very severe, and it takes less than a day for the rash to look kind of scaly and red (like a thin scab over the burn). At that point, it’s fine to use a diaper rash cream or skin protectant. It will help things heal faster.
It’s often the maternity ward staff that fosters one of the hardest baby behavioral issues to kick: pacifier use. A plastic substitute for the breast, a binky leaves most babies content as can be. In fact, when dipped in sugar pacifiers have even been shown to reduce pain in infants during shots, medical procedures, or blood draws. It’s that pacifying quality for which they gained their name that leads many parents to keep up the habit the hospital started, but are binkies good for baby?
Pros for pacifier use in infants:
-Binky use while sleeping may prevent SIDS in the first year of life. In 2005 the AAP began recommending pacifier use during sleep for infants under the age of 1 after a study found they may reduce the risk of SIDS.
-Pacifiers do usually distract and pacify. While some babies are just not binky babies and have no interest in this non-food producing nipple, most are calmed and distracted. Pacifiers can make car rides, doctor visits, and other times when nursing or bottle feeding is impractical fuss-free.
-Binkies help some babies sleep longer and fall asleep faster.The suckling action often makes infants sleep and helps others stay asleep. Many parents swear by a binky at bedtime for this reason.
-Pacifiers may prevent comfort feeding. Some infants eat when upset just to acquire that sucking comfort. A binky allows sucking without feeding and so can prevent over-eating and weight issues.
Cons for binky use in babies:
-Binkies may increase your child’s risk of ear infection.A study done in 2008 found a small increase in middle ear infections in infants that used pacifiers regularly.
-Pacifier use may negatively affect breastfeeding.While studies conflict on the subject, most experts feel that binky use causes babies to breast feed for a shorter length of time, weaning early. Some mothers also report pacifiers cause latch issues while breast feeding.
-Binkies can become habit forming. Much like thumb sucking, pacifier use can become habitual and hard to wean when your child is older.
-Excessive and prolonged pacifier use may lead to dental problems.Numerous studies have shown pacifier use and thumb sucking to cause changes to the dental arch resulting in over, under, or cross bites. In one study, children who continued sucking habits past the age of 2 had a 7.2% higher chance of bite alignment problems. Children who continued past the age of 3 had a nearly 15% higher occurrence of dental arch changes.
When should my baby stop using a pacifier if I do decide to allow it?
Just as a note, any and all pacifier use is recommended to be occasional and not used to replace human contact soothing when possible. You may also want to wait to regularly allow binkies until after breast milk and feeding is well established if you plan to breastfeed. Most dentists at least recommend ditching the binky around age 2 at the latest. Conveniently, many children naturally stop wanting a pacifier in this time frame. Other experts feel babies should not use binkies past the 1-year mark. Still others feel 3 to 4 at the latest. In the end, when to stop using a binky is up to you as a parent if your child doesn’t make the choice on their own before that point.
How can I wean my child from the binky when I’m ready?
There’s really not much to pacifier weaning — you just take it away and brave the storm. You can do so all at once, cold turkey, or slowly over time restricting use little by little. (Example: You can use your binky at bedtime only.)
A few tips that may help include:
-Once you take the pacifiers away, replace them.On that fateful day you get rid of the last binky, give your child a gift to replace them such as a new toy. Some parents like to couple this gift with “the binky fairy,” much like the tooth fairy, who would at night take all the pacifiers and replace them with a treat.
-Once binkies are banished don’t cave. Even one relapse will give your child faith that a world-ending fit may bring it back again. Never cave no matter the inconvenience.
-Avoid lies about what happened to the pacifiers. While a fairy tale like the binky fairy took them may help, lies such as “all the binkies are broken” or “I threw them all away” won’t help. You’re then not teaching your child pacifiers are no longer OK, but that there simply are none. This is bound to back-fire.
-Connect losing this comfort method with growing up. Toddlers just love to feel grown up; explaining to your child why you’re taking away the binky can go a long way. It’s not just an evil new rule mom or dad is enforcing, it’s a rite of passage from baby to big kid.
Bottle feeding a baby isn’t a horribly difficult process, but like most parenting tasks there are tricks, tips, and facts to make the process easier. Our guide on everything you need to know about bottle feeding will walk you through the entire process of how to bottle feed a baby from choosing a bottle and preparing it for use while answering your questions along the way and offering helpful tips and tricks.
One of the most important points in bottle feeding a baby is knowing when and how much to feed.
When to Feed a Baby:
The majority of pediatricians agree that demand feeding is the best way to decide when to feed a baby. Demand feeding, also sometimes called cue feeding, means you feed your baby when he/she is hungry for as long as he/she wishes to eat. You don’t need a baby feeding chart, just let your baby tell you when its time to feed.
How will your baby tell you? To know when to bottle feed your baby watch for cues in behavior that indicate hunger including:
– Side-to-side head movement, as if looking for something.
-Turning towards breast or towards your hand when cheek is touched.
-Sucking on hands, arms, etc.
-Opening of the mouth repeatedly and possibly sticking out tongue.
-Puckering lips or making sucking motions.
It’s unusual for feedings to be stretched more than 5-6 hours apart in formula-fed babies, and 3-4 hours in breast-milk fed babies. The average newborn is hungry every 2-3 hours, though this often slows with age.
How much to bottle feed a baby:
How much to feed is also dependent on your baby’s needs. Every baby will be different, and the right amount may fluctuate with age, what’s being offered, baby size, appetite, and more. The typical newborn infant eats 2-3 ounces every feeding, but you can get a better estimate based on your baby’s weight. Per pound most babies need about 45 calories to grow. So, say your baby is 11 lbs, his/her caloric need is 45 x 11 or 495 a day. For formula, the next step is as easy as checking the label for calories per ounce. In breast milk bottles, an oz has about 20 calories.
When your baby is full, he/she will lose interest in food, stop sucking, or pull away and turn his/her head from the bottle. As long as your baby is showing healthy weight gain and wetting at least one diaper every three hours or three diapers every twenty four hours, you’re doing just fine.
Now that you know when and how much to feed a baby, your going to need something to feed with, which means….
How to Choose Baby Bottles
The bottle you choose for your baby can really affect how well the bottle feeding experience goes, but, unfortunately no guide can tell you which bottle to pick. A bottle that works great for one baby, may not for another. Generally, your baby will have more say in which bottle you chose than you do, so when first beginning bottle feeding, you may want to buy a few different types of bottles and experiment. I may not be able to tell you exactly how to choose a baby bottle, but I can explain the various options available.
A typical bottle consists of two parts, a base and a nipple.
Baby Bottle Bases:
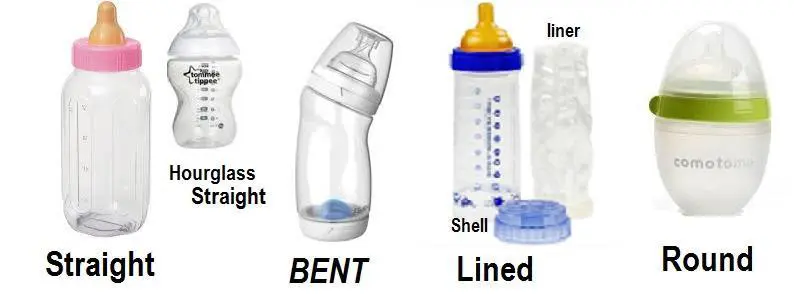
For the bottle base, there are two primary material choices, glass or plastic, but the shape of the bottle itself can vary greatly by brand. Overall, you’ll see four main types in either material.
Straight bottles:
This is your typical baby bottle. Straight bottles are said to be easiest for babies to hold. Straight bottles may also come in a slightly hourglass shape, where the middle is narrower for little hands.
Bent Bottles:
These bottles have an angle to them. The bend in the bottle is meant to reduce the amount of air your baby ends up sucking in by keeping the milk at the top of the bottle.
Disposable Liner Bottles:
These bottles are actually a shell which holds a plastic insert in which milk is placed. The insert is disposed of after use.
Round Bottles:
Round bottles are relatively new and not very common. The base is usually oval in shape with a flat bottom so the bottle can be set down. Much like bent bottles this is an effort to reduce the air your baby gets while feeding.
Glass versus Plastic:
Plastic bottles are basically impossible for a baby to break and often slightly lighter weight while being less expensive. However, plastic bottles do eventually begin to deteriorate and will need to be replaced. Plastic bottles that do not say “BPA free” may leak bisphenol-A into milk if boiled. A baby’s bottle should NEVER be brought to the boiling point.
Glass bottles will never need to be replaced unless broken, chipped, or cracked, but they are also more expensive and heavier than plastic bottles.
Baby Bottle Nipples:
Bottle nipples typically come in three materials: plastic, silicone, and latex. Rubber and silicone nipples both are firmer and will last longer, while latex is softer, more malleable, and may wear out a bit quicker.
In addition to material there are also varies nipple shapes, sizes, and flow rates.
Nipple Shapes:
Traditional: Is your standard nipple.
Orthodontic: Produced by companies such as Nuk, these nipples are designed to fit the shape of your child’s palate.
Nipple Sizes and Flow Rates:
Nipples come in varying sizes based on the bottle type. Typically wider nipples are better for breast fed babies or babies that are being switched between bottle and breast as the wider nipple is closer to the feel of a breast, but some babies prefer the narrower nipples anyway. You can also find bottles with varying nipple length. Some feel a long nipple a nice alternative to the wide-style for breast-fed babies.
Flow rate is determined by age, though some babies drink faster or slower than their age determined nipple. When buying a bottle it should indicate a flow rate and age range. Flow rate is determined by the size and number of holes in the nipple.
Once you have your bottle it needs to be prepared for use and filled.
How to sterilize baby bottles:
Once upon a time it was suggested that all nipples and bottles be sterilized. Today it’s believed that a good hot washing with soap and water is sufficient.
None the less, if you wish to sterilize, this can be done by boiling water and placing the items in them for at least 5 minutes. There are also many bottle sterilizing systems out on the market today. As a mid-point many parents sterilize new bottles and nipples once before use. Be sure to let the items air dry before using.
The final step in how to bottle feed is to fill the bottle and feed your baby. You can use formula or breast milk.
How to Heat the Milk:
Formula can be made with warm water to avoid the need for heating. If the formula has been refrigerated or you are serving pumped or stored breast milk you can heat it by placing the bottle in a pan of warm water on the stove or simply by running hot water over it. Never use boiling water or actually heat formula or breast milk in a pan on the stove. Bottles also should not be microwaved as this may cause heat spots which can burn your baby. In cases other than cow’s milk, it also leads to a reduction in nutrients. Today there are also specialized bottle warmers you can buy to keep bottles toasty and ready if you prefer.
How to Bottle Feed:
Avoid propping a bottle or leaving your baby unattended while bottle feeding as this can result in choking. Once your baby falls asleep and stops eating, you should remove the bottle. Even if your baby is not actively feeding, sleeping with a bottle can cause tooth decay. Its recommended you hold your baby during feedings, but you can opt for any position that feels comfortable so long as your baby is not lying flat on his/her back. A forty-five degree angle should be kept to prevent milk from entering the delicate tubes of the inner ear which can cause ear infections.
Finally, be sure that the nipple of the bottle is always full. Failing to do so will cause your baby to swallow air and lead to uncomfortable gas. You can remedy an empty nipple by increasing the tilt at which you are holding the bottle.
Beyond that, your baby will do what comes natural–eat.
We hope this guide on how to bottle feed a baby has helped you. If not, why not? We always love hearing suggestions for page additions.