
My about-to-be 3-year old wanted a robot birthday party. Being a fairly frugal mom, I always make my kids’ birthday cakes. My first thought for a simple robot cake was to make a sheet cake, put some Transformer action figures from the toy aisle on it, write happy birthday, and be done with it, but you know, he didn’t say he wanted a Transformers birthday, he said robot. I decided to make an actual robot-shaped cake rather than a cake with robots on it. The result was not only simple to make, but very “cool” according to my little man. The cake turned out good enough, I thought I’d share a how-to guide.
How to make a robot cake:
Ingredients you’ll need:
Two boxes of cake mix: I used chocolate with a box of pudding added and milk instead of water, but I let my kids choose the flavor of their cakes. You can also make yours from scratch if you prefer.
Two containers worth of white frosting: I made cream cheese frosting equivalent to about 2 store-bought tubs. As long as its white, you can use any frosting you like.
Black food coloring: Note, that in some areas this can be hard to find when it isn’t Halloween. Plan ahead, you may have to order some.
A frosting writer pen: I used black
Assorted button-shaped candy: I used Rolos wrapper on, mini Rolos, Riesens wrapper off, and part of a Hershey bar
Donuts: I used two round cinnamon rolls, one round twist, and two glazed twists. Frugal tip: Many bakeries offer an after 6 pm special where donuts cost less.
A 13 x 9 pan, a large muffin pan ,and one 4 X 9 bread loaf pan
Instructions:
First, bake one sheet cake in the 13 X 9 pan, one loaf cake in the 4 X 9 pan and two large cupcakes in the muffin pan (papers aren’t necessary). You may opt to do a two- layer cake on the 13 X 9 if you wish, but you’ll require more cake mix and frosting than I did. Allow to cool before frosting.
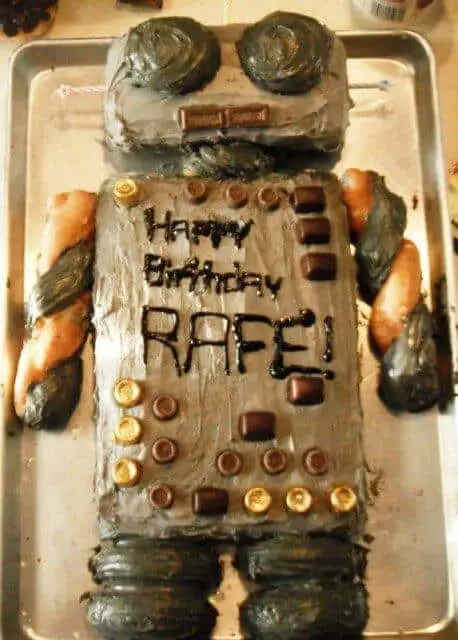
Empty the frosting into a large bowl, add drops of black food coloring, and mix until your desired soft-grey to silver robot shade is obtained. Frost the sheet and loaf cake and arrange. You may find rinsing your frosting wand between applications helps it smooth on easier. I used a Commercial cookie sheet for my robot cake and it fit perfectly. You may have to construct a serving tray if you don’t have one. See the photo attached to this article for arrangement. The loaf cake is the robot’s head, and the sheet pan is the robot’s body.
Add more food coloring to the left over frosting to achieve a slightly darker grey and frost the tops of the cupcakes, then cut the muffin tops off, and attach them as eyes.
Next, cut two round donuts in half (this is where I used my cinnamon roll donuts), frost both halves, and attach as the robot’s legs. Frost two donuts (this is where I used the twist donuts), and situate them as the robot’s arms. Finally, cut another round donut in half (my round twist) and place it between the loaf and sheet cake for a neck joint. Again, you can look at the photo of this article for a visual guide.
To finish up, write “Happy birthday” or your desired message in a robot-like square font. Attach candy as buttons as desired. Break off two squares of Hershey bar and score with a knife to appear as a mouth. Since my son was turning three, I attached candles as antenna on the robot’s head. This would work well for robot cakes for children turning one to three.
Overall, I would rank this robot cake firmly in the beginner’s category on difficulty level, it really is as easy to make as baking a cake, but looks pretty neat.